This post may contain affiliate links. Please see my affiliate disclosure for more information.

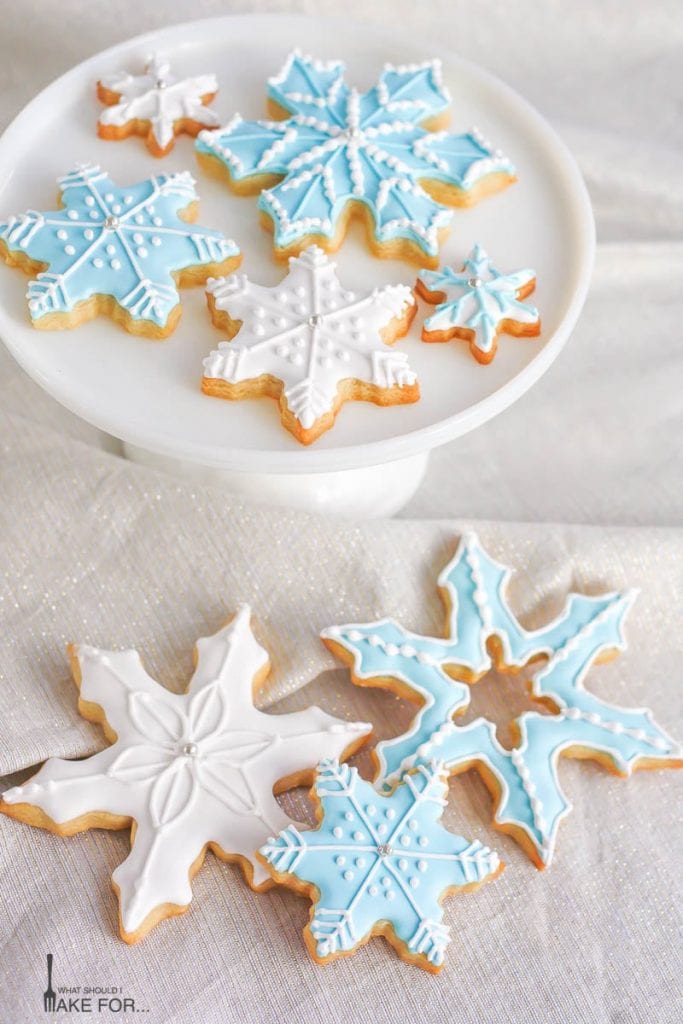
Snowflake cookies decorated with blue and white icing make a sweet holiday display. These simple cut out cookies are decorated with royal icing and will wow at your cookie exchange!

One of my favorite types of cookies to bake during this time of year are cut-out snowflake cookies. Rolled, baked, and piped with royal icing into sweet designs that are almost too pretty to eat. Almost.
I have oh, about a gazillion cookies cutters from when I had a baking business. Bins filled with cutters line the shelves in my basement just waiting for the right season or holiday to roll around and have a turn in the spotlight.
And the winter holidays require three big bins. Hanukkah, Christmas and another packed with all sorts of winter-inspired cookie cutters…snowflakes, snowmen, mittens…you get the idea.
Every year I love to try something new when decorating holiday cookies…a new color combination, a new pattern, or design. It’s as close as I’ll ever come to being an artist, using my buttery cookie as a canvas and sugary icing as paint.
One of my all time faves? White on white snowflake cookies for their simplicity and ease!
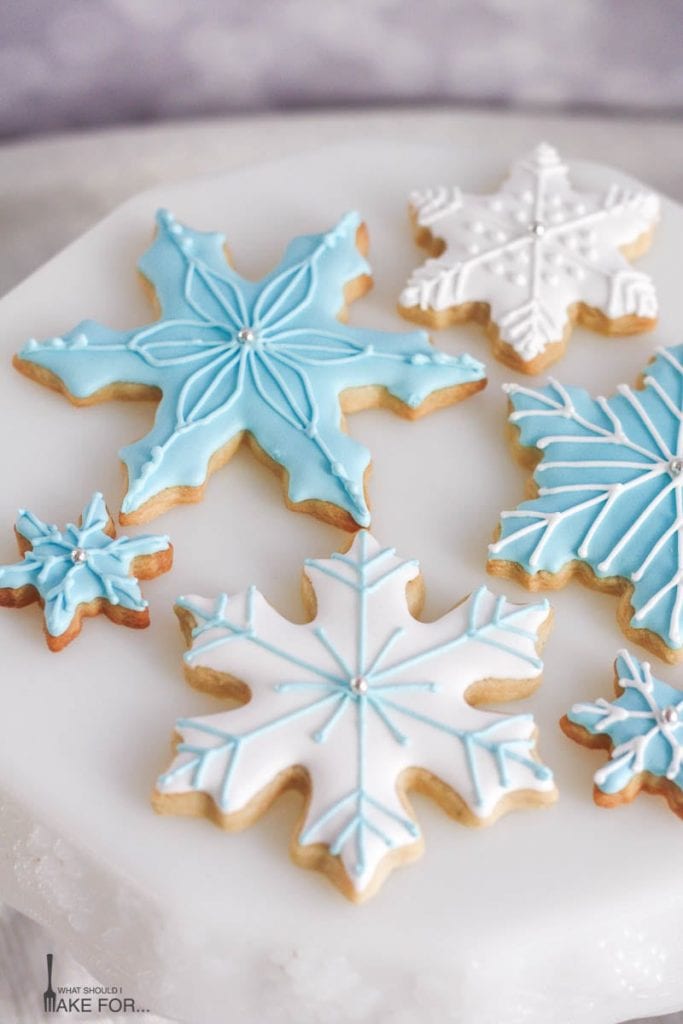
This year I give you blue and white snowflake cookies! My kids not only love to eat them, but they enjoy piping designs of their own.
I’m not going to lie, there is a learning curve to decorating with royal icing. It takes a while to get a handle on the right consistency to flood or fill the cookie and also find just the right piping consistency that’s good for the details. The good news is, it’s a fun process to learn and you can eat your mistakes!
You can also skip the royal icing altogether; just sprinkle the cookie cut-outs with colored sprinkles or sugar crystals before baking. The snowflake cookies will be ready to gobble up just as soon as they’re cool enough to handle.
So, don’t overthink it and have fun when you’re decorating. You can check out my video for a little icing inspiration – happy baking!

Tips for success
- Be sure to chill the cut-out cookies before baking to ensure that they maintain their shape.
- Cool the cookies completely before decorating with royal icing.
- Meringue powder is a great substitute for raw egg white in royal icing and is safe to eat!
- Be sure to sift the confectioners sugar before beating so you don’t have any lumps in your royal icing. Even tiny lumps can clog your decorating tips and make decorating a hassle.
- Beat the royal icing until you have stiff peaks. Add the water very gradually (think a teaspoon or two at a time) until you reach your desired piping consistency.
- The icing will darken as it hardens, so don’t go crazy with the food coloring. I recommend gel food coloring for the best results in color and consistency.
- Allow the icing to harden for several hours (overnight is ideal) before storing or serving.
More holiday cookie favorites
- Nutty Thumbprint Cookies
- Walnut Snowball Cookies
- Molasses Cookies
- Italian Cookies
- Classic Shortbread Cookies

Snowflake cookies decorated with blue and white icing make a sweet holiday display. These simple cut out cookies are decorated with royal icing and will wow at your cookie exchange!
- 3 cups all purpose flour
- ¼ tsp baking soda
- ½ teaspoon salt
- 1 cup unsalted butter, softened (2 sticks)
- 1 cup sugar
- 1 large egg
- 1 1/2 teaspoons vanilla
- 1 pound confectioners sugar (SIFTED)
- ¼ cup meringue powder
- ½ tsp cream of tartar
- ½ cup water
- 1 tsp clear vanilla
- Gel food coloring (if desired)
-
Sift flour, baking soda and salt together, set aside.
-
Cream butter and sugar. Add the egg and mix to combine.
-
Add the flour in two batches, and blend until mixture just holds together.
-
Add vanilla and mix to combine.
-
Roll out between two sheets of wax paper and cut out shapes with cookie cutters.
-
Place shapes on baking trays lined with parchment paper and put in freezer for about 10 minutes before baking.
-
Bake at 350 degrees until cookies are just golden, about 8-12 minutes, depending on the shape/size of the cookie.
-
Combine confectioners sugar, meringue powder and cream of tarter in large mixing bowl. Add water and clear vanilla and beat on high speed with paddle attachment until stiff peaks form, but mixture is not dry. Add water to reach desired piping consistency (tsp or two at a time), mixing after each addition of water.
-
Add drops of gel food coloring to reach desired color, but keep in mind the color will deepen and darken as the icing dries.
-
Fill piping bags fitted with round metal tips and ice the cookies. I divide the icing into two bowls, 2/3 reserved for flood icing (a thinner consistency ideal for covering the entire cookie) and 1/3 reserved for decorating (a little thicker and used for piping designs). Allow the base to dry for a couple hours before piping designs.
-
Let completed cookies dry for at least 12 hours before storing in air tight containers.
-
Cookies will keep for several days stored at room temperature.
Recipe yields 30 – 2 inch cookies
- Be sure to chill the cut-out cookies before baking to ensure that they maintain their shape.
- Cool the cookies completely before decorating with royal icing.
- Meringue powder is a great substitute for raw egg white in royal icing and is safe to eat!
- Be sure to sift the confectioners sugar before beating so you don’t have any lumps in your royal icing. Even tiny lumps can clog your decorating tips and make decorating a hassle.
- Beat the royal icing until you have stiff peaks. Add the water very gradually (think a teaspoon or two at a time) until you reach your desired piping consistency.
- The icing will darken as it hardens, so don’t go crazy with the food coloring. I recommend gel food coloring for the best results in color and consistency.
- Allow the icing to harden for several hours (overnight is ideal) before storing or serving.


Mary Ann | The Beach House Kitchen says
Wow Cathy! These sugar cookies are absolutely beautiful! You are so talented. You make it look so easy in your video! I’m sure your kids just love these!! On my list of things to learn!
Cathy says
Thanks Mary Ann! I really do love decorating cookies for the holidays. Honestly figuring out how to create and upload a video was harder than piping designs!
Cheyanne @ No Spoon Necessary says
I am LOVING these sugar cookies, my dear! You decorated them perfectly and your photos are gorgeous! Honestly, they are so pretty I’d almost not want to eat them! ALMOST, because who am I kidding? I can’t say no to devouring sugar cookie after sugar cookie! Your video of tips is awesome as well!! Pinned! Cheers!
Cathy says
Thanks Cheyenne! They don’t last long around here either, which is a shame because they keeps beautifully for days and even weeks! Guess we’ll just have to make more…maybe gingerbread next time…
Tracy | Baking Mischief says
What a great video! I’ve never watched cookie decorating in progress before–you make it look so easy and very tempting to try.
Cathy says
I hope you give it a go. I learned so many tips for decorating with royal icing by watching videos. Hope mine can be helpful to someone too. Happy baking!
Ellie says
Hi Cathy! I’m really looking forward to trying your recipe this Christmas. What cookie cutter did you use for the one in the icing tutorial?
Cathy says
Hi ellie! I have so many cookie cutters I’m not sure of the exact one, but it’s either this one or very close: https://www.amazon.com/gp/aw/d/B00266PQ82/ref=mp_s_a_1_1?ie=UTF8&qid=1479475859&sr=8-1&pi=SY200_QL40&keywords=snowflake+cookie+cutter&dpPl=1&dpID=41E16bvxrFL&ref=plSrch
Ellie says
Thank you!!
mo says
What color blue did you use?
Cathy says
I used a couple drops of Americolor gel in Sky Blue.
Susan says
What size tip did you use for the outline and what size tip for the finishing touches?
Cathy says
I always use a #2 round tip for outlining and flooding and use the same consistency icing for both. I’ll use a slightly firmer icing for piping details and typically a #1 or #2 depending on the level of detail.
Margje says
What a great cookies! I came here via the easter macarons (they are beautiful!). What is meringue powder? Do you need it? Is it for taste? I have never heard of it and am unsure if it can be found here (The Netherlands)…
Cathy says
Thanks Margie. Meringue powder is a stabilizing powder of egg whites and corn starch that I use in place of real egg whites in royal icing. I buy it from Amazon and it’s readily available here in the states. If you can’t find it, you can use a recipe that calls for regular egg whites instead.
Phyllis says
Cookie recipe great! These came out perfect!
Cathy says
Awesome! Thanks Phyllis!
Dafne Antunes da Silva says
So beautiful! !
Cathy says
Thank you!
Lois Gibbons says
What do you add to the royal icing to thicken it for decorating after you’ve flooded the cookie? Also why freeze cookies for 10 min.?
Cathy says
If you read step 10 of the recipe, I divide the icing into piping and flooding consistencies and keep them in two bowls. You can’t thicken the icing after you’ve thinned it. I freeze the cookies because chilling the dough solidifies the butter in the cookies, so they don’t spread as much during baking. Hope that helps!
Marcia says
When you use wax paper for rolling out dough, do you flour it at all?
Cathy says
I find that if the dough is well chilled, no flour is needed on the wax paper. If your dough sticks, you can lightly flour it or pop it back into the frig to chill.
Denise says
I’ve been making these for a long time now, for Christmas, everyone loves them especially the kids because they look so special and taste so good, they aren’t hard to make
Cathy says
i’m so happy you and your family have been enjoying them Denise! i would love to see a pic if you remember to snap one next time you make them. xo
Nirmala says
Hi, the cookies are delicious. Thank you
How don you get the white Color? When I tried the white becomes a transparent Color. Can you tel me where am I do a mistake? Thank you
Cathy Roma says
The recipe aa written should yield an opaque white color. Perhaps you used too much water? You can always add a little bright white gel food coloring for extra whiteness.