This post may contain affiliate links. Please see my affiliate disclosure for more information.

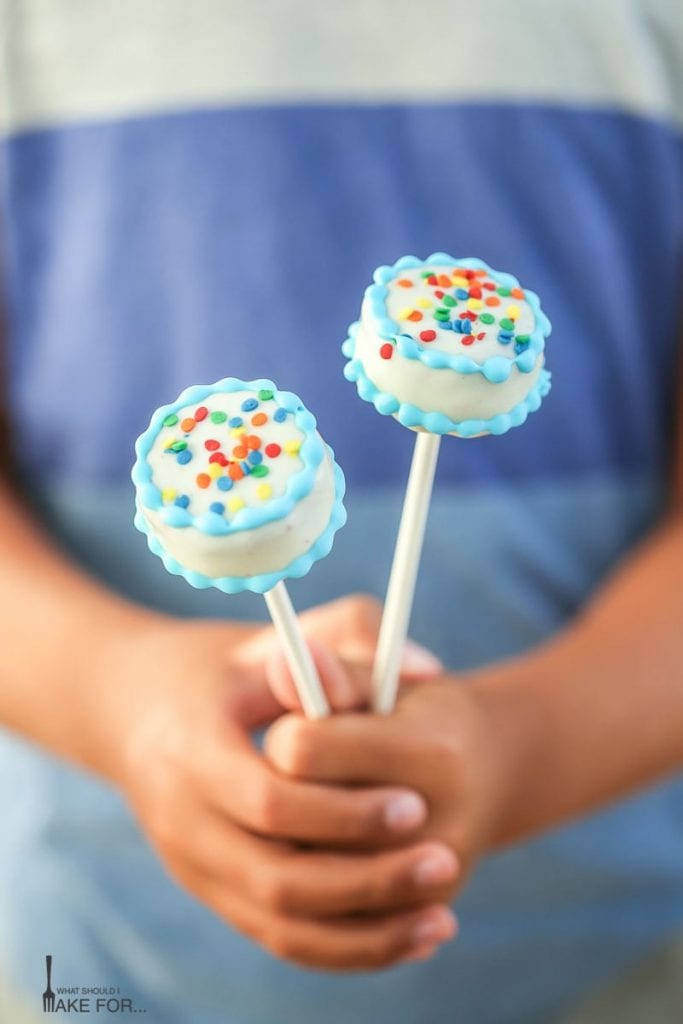
Celebrating a birthday? These birthday cake – cake pops are just the way to get the party started. Cake gets mixed with frosting, cut out, dipped, and A CANDLE too!

No matter what your age, these mini birthday cake – cake pops bring just the right amount of whimsy and fun to any birthday celebration.
Birthdays are a funny thing. It seems the older you get, the less you’re supposed to care about celebrating. Whereas when you’re turning 5, it’s perfectly acceptable to run around practically shaking with glee at the thought. Thing is, it should really be the opposite.
Instead of shunning the celebration as we get older, we should embrace it. Life is filled with challenges and heartbreaks and why not take a day to just enjoy. Instead of making it a day of complaining about getting older, make it a day of being grateful for a new year.
Easier said than done on the other side of 40, but why not do it up? And these cake pops are a good way to start.

As much as I love cake, sometimes just a bite or two is all I need. And cake pops provide just the right amount.
I love that these little guys look just like individual cakes. And with a little candle on top, you can light one or a whole mess of them up and sing along just like you do with a proper layer cake. My recipe calls for red velvet cake, but you can use your favorite flavor and the same decorating method.
Be sure to check out the video below to see how I made these sweet birthday cake – cake pops.

I think you’ll agree that these mini cakes are perfect whether you’re turning 5 or 45. And for my birthdays going forward, I plan to embrace my inner 5 year old and celebrate with gusto.
And of course a bite or two of cake.
Tips for success
- Start off with less frosting than you think you need to add to the crumbled cake, as you can add more as you mix it. The crumbled cake and frosting should mix together to form a play-doh-like consistency, not too wet or too dry, but enough that it holds together.
- After forming the discs and chilling, let them warm up just a bit before dipping. The coating has a tendency to crack if the balls are too cold or the coating too warm. This takes a little trial and error to get it right if you’re new to cake pops.
- Do NOT overheat the candy coating. My rule of thumb is to heat it in 30 second increments in the microwave and stir well each time. I also heat mine at 50-60% power….trust me…low and slow prevents a gloppy mess!
- If your melted coating is too thick, add a few drops of canola oil and mix well. You want it to be the consistency where it drips off easily when you tap off the excess coating after dipping.
- Allow the candy coating to sit at room temperature for a minute or two before dipping. You don’t want too great a temperature swing between the cake balls and coating which can lead to cracking.
- The biggest tip…don’t sweat it if they’re not perfect the first time you make them! It takes a little practice but soon you’ll find a rhythm.
Love cake pops? Try these recipes!

- 2 oz unsalted butter, softened (1/2 stick)
- 1/8 cup vegetable oil
- 3/4 cup sugar
- 1 egg
- 1 Tbsp red food coloring
- 1/2 cup buttermilk
- 1 cup AP flour
- 1 Tbsp unsweetened cocoa powder
- 1/2 tsp kosher salt
- 1 tsp baking soda
- 1 tsp white vinegar
- 1/2 tsp vanilla extract
- 4 oz cream cheese, softened (brick cream cheese, not whipped)
- 2 oz unsalted butter, softened (1/2 stick)
- 8 oz confectioners sugar (1/2 box)
- 1/2 tsp vanilla extract
- 12 oz white chocolate melting wafers (I like Ghirardelli)
- 1/2 cup colored candy melting wafers (for piping trim)
- 30 lollipop sticks
- sprinkles or edible confetti
- birthday candles (cut into smaller candles)
-
Preheat the oven to 350 degrees and grease an 8 inch round cake pan. Line the bottom with a parchment round if desired.
-
Cream together the butter, oil and sugar until light and fluffy. Add the egg, blending well.
-
Add the food coloring and buttermilk and mix until incorporated.
-
In a separate bowl, whisk together the flour, cocoa, salt and baking soda.
-
Slowly add in the flour mixture and mix until just combined.
-
Add the vinegar and mix, then add the vanilla and mix until just combined. Do not overmix.
-
Spread the batter in the prepared pan and bake for about 20-25 minutes or until a toothpick inserted into the center comes out clean.
-
Beat cream cheese and butter until fluffy, about 2 minutes on med/high speed with an electric mixer.
-
Gradually add in confectioners sugar, mixing well to combine.
-
Stir in vanilla extract until incorporated.
-
Crumble cooled cake by hand or in a food processor until fine crumbs. Pour the crumbs into a mixing bowl and add 1/2 - 3/4 cup frosting (the rest can be refrigerated and stored for another use).
-
Mix with the paddle attachment of a mixer on low speed until mixture holds together and has the consistency of play-doh or wet sand. Alternatively mix well by hand with a rubber spatula or wooden spoon.
-
Spread cake/frosting mixture into an 8 inch round cake pan and smooth, pressing down as you smooth. It should be about 1 inch thick.
-
Line a baking sheet with wax paper or parchment and using the round cutter, cut out about 28 rounds, reforming scraps as needed. Lay the rounds on the baking sheet and place in the freezer for 15 minutes or in the refrigerator for 1-2 hours.
-
Remove about 10 rounds at a time and allow to to sit at room temperature for about 5 minutes before dipping.
-
Melt candy wafers according to package instructions. Dip the end of each lollipop stick into the coating, then stick in each round and allow to harden before dipping.
-
Dip each round and tap off extra coating, tapping on your hand holding the stick, not the stick directly.
-
Sprinkle with edible confetti or sprinkles and place a candle in the middle (if using) and stick the pop in the styrofoam block to dry.
-
Melt colored candy wafers according to package instructions. Use the melted wafers to pipe an upper and lower decorative border on each pop to resemble a birthday cake. Use a disposable pastry bag with just the end snipped or fit it with a #2 round tip.
-
Pops can be stored at room temperature for 3 days.
Special Equipment:
*1 1/2 inch round cutter, styrofoam block, lollipop sticks, disposable pastry bag (#2 pastry tip - optional), trimmed birthday candles (optional)
- Start off with less frosting than you think you need to add to the crumbled cake, as you can add more as you mix it. The crumbled cake and frosting should mix together to form a play-doh-like consistency, not too wet or too dry, but enough that it holds together.
- After forming the discs and chilling, let them warm up just a bit before dipping. The coating has a tendency to crack if the balls are too cold or the coating too warm. This takes a little trial and error to get it right if you’re new to cake pops.
- Do NOT overheat the candy coating. My rule of thumb is to heat it in 30 second increments in the microwave and stir well each time. I also heat mine at 50-60% power….trust me…low and slow prevents a gloppy mess!
- If your melted coating is too thick, add a few drops of canola oil and mix well. You want it to be the consistency where it drips off easily when you tap off the excess coating after dipping.
- Allow the candy coating to sit at room temperature for a minute or two before dipping. You don’t want too great a temperature swing between the cake balls and coating which can lead to cracking.
- The biggest tip…don’t sweat it if they’re not perfect the first time you make them! It takes a little practice but soon you’ll find a rhythm.
Update Notes: This post was originally published in August 2016 but was republished with tips in June 2019.
14


Karen @ Seasonal Cravings says
These are the cutest things ever. I’m not great at decorating cakes but you always make it look so easy with your videos. I’m quite sure mine wouldn’t turn out as good looking as yours. Love these!
Cathy says
Thanks so much Karen! I promise you it’s easier than it looks.
Mary Ann | The Beach House Kitchen says
These are absolutely perfect for any age Cathy! They’re totally adorable! I think I’d need some help to get mine to look as nice as yours!
Cathy says
Thanks Mary Ann! Good for kids and kids at heart.
rebecca | DisplacedHousewife says
These look so good!!!!! Do we get to eat these for dinner??
Cathy says
Yes! They go great with a glass of wine!
Alida | Simply Delicious says
Is that not the cutest thing you’ve ever seen!? Oh my gosh. I LOVE those cake pops.
Cathy says
Thanks Alida! Brings out the kid in all of us.
Leslie @ Flora Foodie says
Oh my word, so adorable! I cannot wait to make these!
Cathy says
Thanks Leslie! Send me a pic if you do!
Charlotte @ What Charlotte Baked says
These are ridiculously cute! I am obsessed with them! Especially loving the little candle 🙂 Adorable.
Cathy says
Wow! Thanks so much Charlotte!
lekcjewkuchni.blogspot.com says
So cute, I’m sure they were delicious:)
Cathy says
Thanks! They were gobbled up!
Cheyanne @ No Spoon Necessary says
Happy belated birthday to your hubby and your friends little girl! I agree, birthdays should remain special and be embraced no matter what the age. I’m thinking next year I need THESE to help me celebrate in style! These are SO adorable, Cathy!! I swear you make the cutest baked treats EVER!! I am always in awe of your talent, lady! My husband is turning the bit 3-9 in a couple months, and I can tell you I WILL be making these!!! Pinned!! Cheers, lovely!
Cathy says
Thanks so much Cheyanne. I made these all the time when I had my baking business. Now it’s fun to do it again for friends and family. I hope you give them a go for your guy. He’ll love them!
Mimi says
Hi these look lovely! I think I might try and make these for my little sister’s birthday coming up soon! Was just wondering if you tempered the chocolate or just melted it?
Thanks, Mimi.